What is PAL and NTSC?
PAL and NTSC are the two most common used standard broadcast formats. PAL stands for Phase Alternating Line. NTSC stands for National Television Standards Committee. PAL adopts a frame rate of 25 fps and 720x576 aspect ratio, and is widespread in most of Europe, Australia and large parts of Africa and Asia. For NTSC, a frame rate of 30 fps at an aspect ratio of 720x480, is used in North America, Japan and South Korea.
Why need convert PAL to NTSC or NTSC to PAL?
After knowing about PAL and NTSC, let us talk about why need convert PAL to NTSC or NTSC to PAL. If you have a camcorder purchased in Australia, you will be unable to play the videos shot by the cam on your home player in United Kingdom or other countries using PAL, you will get black screen or other playback problems. This principle also applies to DVD as well. A PAL DVD will not play on most DVD players in North/South America. The solution is to find a converter to change NSTC to PAL or change PAL to NTSC with several options.
Best Video Converter for Converting PAL to NTSC or NTSC to PAL
Here I highly recommend Pavtube iMedia Converter for Mac to all the users. This program not only convert video from NTSC to PAL, but also convert NTSC DVD to PAL DVD. It also supports various video conversion between 250+ formats. Besides, you can also convert any SD/HD/4K video to format such as mp4 so that you can add video to iPod, iPad, iPhone, Android phones, TV, Game consoles, or upload video to Facebook, YouTube etc. Moreover, it includes a built-in video editor, which enables you to split, merge, trim, crop, add watermark, adjust video effect, edit audio and insert subtitles. Windows user van get Pavtube Video Converter Ultimate.
Free download the excellent video covnerter ultimate for Mac
Full guide to Convert PAL to NTSC or NTSC to PAL on Mac (macOS Sierra included)
Step 1: Add source video files
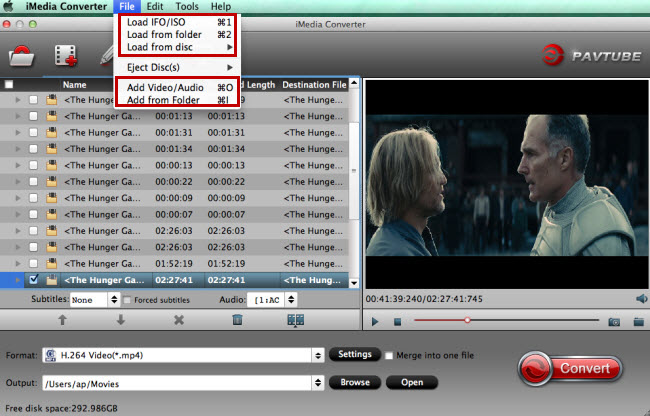
Launch the application on your computer, click "Load from disc" option to import DVD from optical DVD drive to the program.

Step 2: Select output file format
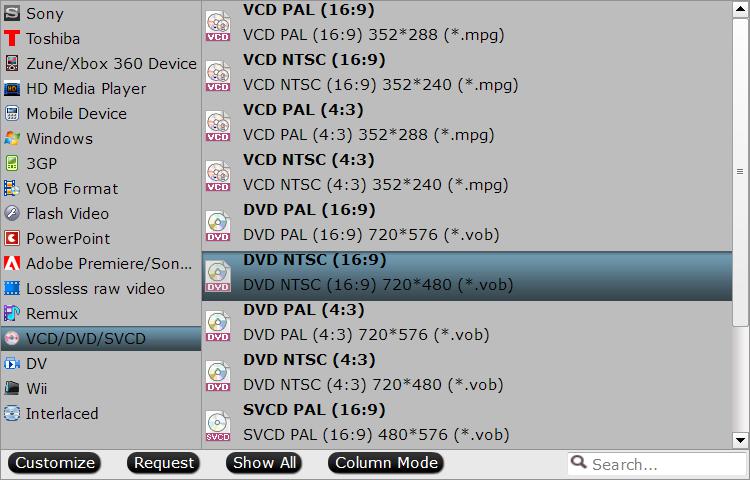
Go to "Format" drop-down list, if you want to convert PAL DVD to NTSC DVD, you can choose to output "VCD/DVD/SVCD" > "DVD NTSC (16:9)", if you want to convert NTSC DVD to PAL DVD, choose to output "VCD/DVD/SVCD" > "DVD PAL (16:9)".

Step 3: Change output video resolution and frame rate.
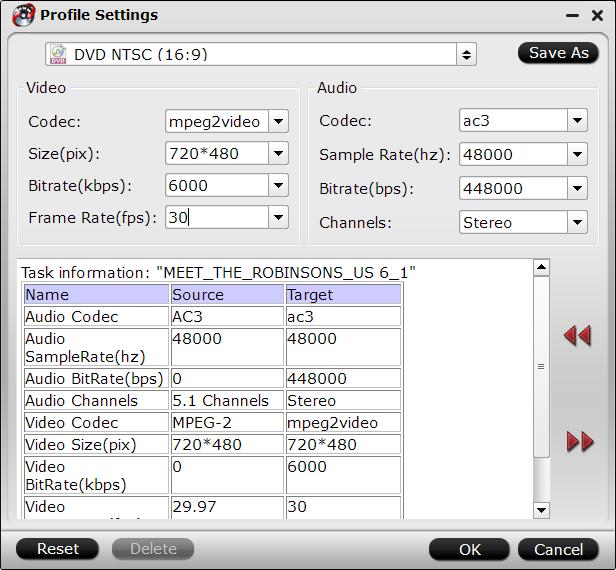
Click "Settings" icon on the main interface to open "Profile Settings" window, when you choose to output NTSC DVD, set the output file size as "720x 480" and the frame rate as 30, if you choose to output PAL DVD, adjust the output file size as "720x576" and the frame rate as 25.

Step 4: Start the onversion
After all the settings is completed, you can carry out the whole conversion process by hitting the right-bottom "Convert" button. Have a try.
Read More:
Convert MPEG4-AVC/H.264 AVCHD on Mac | Transcode AVCHD 3D MTS on Mac
Transfer Sony camera recordings to iPad on Mac | Burn Canon MOV to DVD on Mac
Convert Sony AVCHD video to MP4 on Windows/Mac | Convert MKV to VOB on Mac
Convert and burn AVCHD to DVD on Mac | Import MediaPortal recorded TS files to FCP X
Canon HF M500 AVCHD workflow on Mac | Burn Final Cut Pro projects to DVD on Mac
Convert MTS/M2TS to VOB for DVD authoring/burning on Mac | Import AVCHD to Final Cut Pro 7