Media Servers are rage recently. Among many servers on the market, Plex Media Server must be on the top rank because it successfully integrates the advantages of Netflix and Kaleidescape into itself: it’s practically free and can provide playback for your Blu-ray movies in their original quality. Here, we’re going to instruct you how to set up your own Plex system and rip Blu-ray into Plex server for playback. Before setting up Plex system and successfully running it, you should make sure: 1.You have the free Plex Media Server software which sends your content to the playback devices. 2.You need a Plex Client playback software on a home theater PC, like PS4, Roku. Here, we take PS4 as the instance to build the home theater system. 3.You have to store your Blu-ray to computer hard drive so that Plex can recognize the content. In the later part of the article, we will show you how to backup Blu-ray to computer for Plex with professional Blu-ray Ripper Part 1: Install Plex Server 1.Download Plex Media Server for free from the Plex Downloads page, choose the platform you need or device you need and download the program. Here, we choose Windows platforms as an example. 2. Install and set up Plex Media Server. Install Plex by following the usual installation method, launch Plex Media server and an install icon will shown to the bottom right of the screen. To setup the Plex Media Server, choose “Media Manager.. from the Plex icon in the system tray. 3. Add local movies to Plex Media Server. Click the “+” icon on left side to open “Add library” window, select “Movies” type, then press “Next”, you can then choose a language if need be, then click “Next” to open another window, press “add folder” to find the folder where your local movies are located, click “Add library” to finish movies to Plex Media Server adding process. 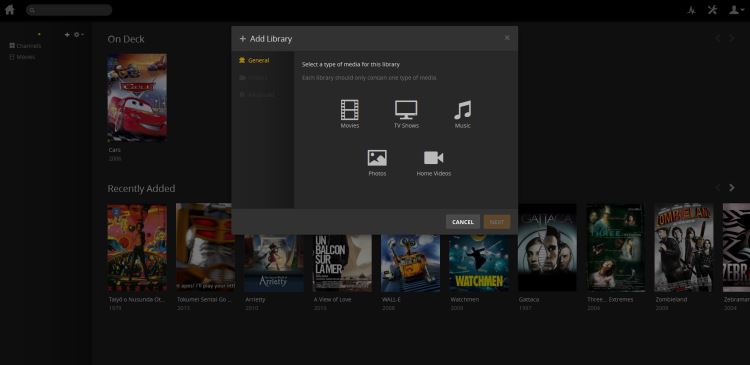 4. Sign your Plex account. From the top-right triangle drop-down list, select “Sign In” option to log in with your plex account or sign up if you don’t have an account. And you will finish the whole Plex Media Set up process. Part 2: Access Plex content on PS4 web browse 1.First, open the web browser on your PS4. This is found on the home screen and the icon looks like a globe with www on top of it. 2. The PS4 web browser should now open, so go to the address bar at the top and type in www.plex.tv/web. 3. The Plex website should now load, and you need to sign in with the same username and password you used when setting up Plex Media Server on your computer. 4. You’ll then be presented with a menu showing the movies you have added to your libraries. 5. You can begin browsing and enjoying your movies straight away!
 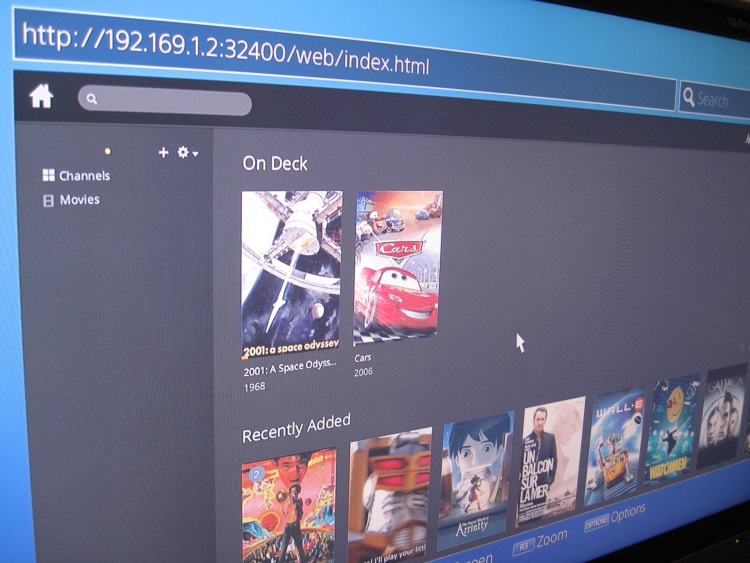 Part 3: Backup Blu-ray to Plex Media Serve Step 1: Preparation Make sure you have a internal or external Blu-ray drive on your computer. Then download and install Pavtube ByteCopy:
 Other Download: - Pavtube old official address: http://www.pavtube.cn/bytecopy/ - Cnet Download: http://download.cnet.com/Pavtube-ByteCopy/3000-7970_4-76158512.html The reason I choose to use ByteCopy to rip Blu-ray to Plex is because it is professional, fast and easy to use for common people. It can rip all the newest and region-locked Blu-ray to Plex supported format with original video quality. It can output nearly all video and audio formats you already saw. In addition, it can extract subtitle from Blu-ray and move over all contents from Blu-ray disc with all audio/subtitle tracks and chapter markers in lossless MKV. Step 2: Start to rip Blu-ray to Plex Launch ByteCopy on your computer then click “File” to load Blu-ray movie to the app. Afterwards, hit “Format” to choose output format. You should select output format according to the supported format of the playback devices. PS4 can support MKV, MP4, etc. So you can specify the target format from “Common Video”, “HD Video” and optimized format column “PS3/PSP” profile.
 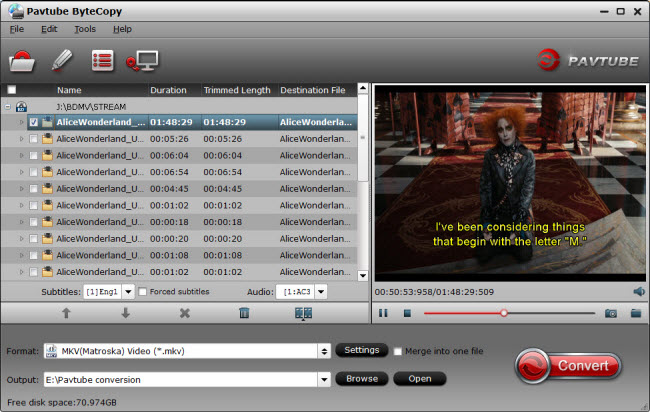 Step 3: Meet personal need (Optional) There are many tricks in the app. “Merge into one file” on the interface can combine your several chapters. “Settings” enables you to adjust video/audio parameters. “Edit” allows you to trim video footage, crop unwanted area, add watermark, etc. All of these are designed for those who have special needs. Step 4: Finish the Blu-ray ripping process Click the button “Convert” on bottom right to get down to ripping Blu-ray to Plex. And after conversion, you’ll get the converted Blu-ray in output folder for Plex. Then follow the steps mentioned on the top of the article to add Blu-ray to Plex server. Conclusion Now, you have put all the contents including Blu-ray to Plex server. You can access these media from your any devices only you have Plex account at home or on the go. More Get 3D Blu-ray to watch on Galaxy Note 4 in Gear VR The Easy Way to Watch DVD movies on Surface Pro 4 Can Nexus Player stream iTunes Movies to TV for playback? Play H.265/HEVC Movies on Xbox One/Xbox 360 Two solutions to Fix MKV files won’t play on Yosemite issue Copy Oscars 2016 Nominations To Plex For Nvidia Shield Android TV Downsize Sony 4K XAVC to 1080p for Playing Smoothly Rip and Stream Blu-ray/DVD discs for playing on HDTV with high quality Src How to Set Up Plex System on PS4 and Rip Blu-ray to Plex
Fronting a shelf of Blu-ray and DVD discs covered with dust, have you got a headache? Do you still take lots of time to find the movie you want from the thousands of discs? Have you heard about Home Automation Expert? This means that you can digitalize you Blu-ray/DVD collection to NAS. This behavior gives you many benefits: free space at your home, more convenient management and organization, wider compatibility with multiple media players, safer storage… 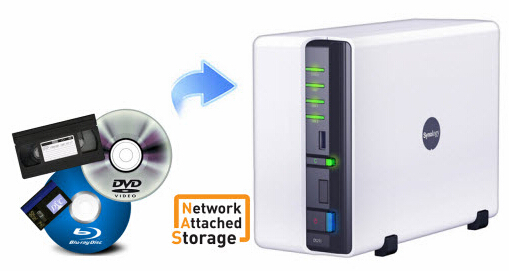 Related Search: Blu-ray/DVD to Seagate Wireless Plus | Blu-ray/DVD to WD MyCloud | Blu-ray/DVD to Mini External Hard Drive Migrating physical Blu-ray/DVD discs to NAS in digital format, you need a Blu-ray Ripper. a Blu-ray ripper can remove the complex encryption in Blu-ray/DVD discs and convert them to normal MP4/MKV/AVI, etc format. As far as I know, Pavtube ByteCopy is a top-selling Blu-ray/DVD Ripper in the market which has the following features: *Break down the encryption in BD&DVD discs, including AACS, BD+, Disney encryption, region codes, Sony encryption, etc. *Rip Blu-ray/DVD to ASUSTOR AS1004T NAS, Synology NAS, QNAP NAS and other NAS *Convert Blu-ray/DVD to H.265, M3U8, MP4, MKV, AVI, FLV, MOV, etc with original video quality. *Copy the entire Blu-ray/DVD disc to NAS in original file structure with all subtitle tracks and audio streams preserved. *Backup Blu-ray/DVD to iPhone, iPad, Microsoft Pro, PS3, PS4, Xbox 360, etc optimized format to NAS. *Allows users to shrink Blu-ray/DVD movies size to store more movies to the NAS *Compatible with Windows 10/8.1/8/7/XP, etc *Has the equivalent Mac version which supports OS X El Capitan, Yosemite, Mavericks, etc Free download and install: Other Download: - Pavtube old official address: http://www.pavtube.cn/bytecopy/ - Cnet Download: http://download.cnet.com/Pavtube-ByteCopy/3000-7970_4-76158512.html How to digitalizing Blu-ray&DVD to NAS to free space at home? Step 1: Import Blu-ray/DVD movies Run the app and insert Blu-ray/DVD to drive. Click “File” to load the Blu-ray/DVD movies to the program. Tips: 1.You can add more than one Blu-ray/DVD movies at a time for it has batch conversion function. 2. You can choose desired subtitle and audio track and forced subtitle below the chapter list.
  Step 2: Backup and convert Blu-ray/DVD Here, you have four choices: Option A - Full Disc Copy Blu-ray/DVD to NAS You can keep all the information in Blu-ray/DVD movies, including main title, advertisement, chapter markers, review and the whole audio/subtitle streams. Click
  on the top of the menu. Option B - Directly Copy Blu -ray/DVD to NAS Just the main title of the original Blu-ray/DVD disc will be preserved in this way. It will save many space of your NAS. Navigate to “Format” > “Copy” > “Directly Copy”
 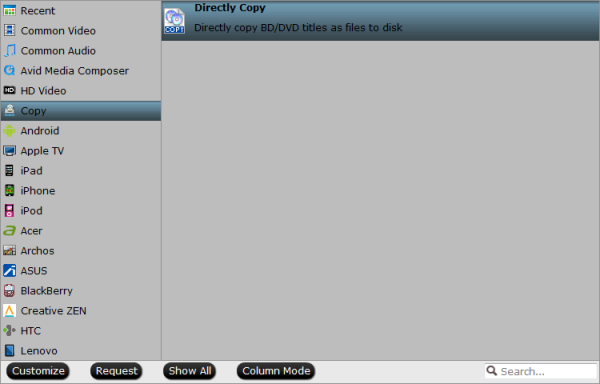 Option C – Convert Blu-ray/DVD to MP4/MKV/MOV to NAS Transforming Blu-ray/DVD to MP4, MKV, MOV, AVI, etc popular format gives you wide playback on different devices via NAS. Click “Format”, you can choose the desired format in “Common Video” or “HD Video” profiles. On the other hand, you can choose the optimized preset for mainstreaming multimedia players, like PS3, PS4, Microsoft Surface Pro.
  Option D – Rip Blu-ray/DVD to lossless MKV In this way, you can extract lossless MKV format from Blu-ray/DVD discs with multiple subtitle/audio tracks and chapter markers preserved. Click the format bar to follow “Multi-track Video” and “Lossless/encoded Multi-track MKV (*.mkv)”.
  Step 3: Rip DVD/Blu-ray to NAS If you chose the latter three ways, click big red “Convert” on the UI to begin Blu-ray/DVD ripping process. Locate the generated video in output folder. After you migrated the ripped Blu-ray/DVD movies to NAS, you can watch these movies via NAS on your TV, Tablet, PS4 and other DLNA enabled devices. If you have many iTunes purchased movies and want to remove the DRM to transfer the iTunes movies to NAS, you can use Pavtube ChewTune. Money saving tip – Software Bundles: Pavtube ByteCopy($42) + Pavtube ChewTune ($29) = $54.9, Saving $16.1 That means, you can get a top-ranked DRM removal program only if you paid more $12.9. More Play 3D Movies on Gear VR through Oculus Cinema Get Amazon Prime Movies on Surface tablets for Playback Remove iTunes DRM and Convert iTunes video to Windows DVD Ripping Software-2D 3D Movie Tips HDTV can’t recognize the ISO files on the USB storage? Play 3D Movies on Gear VR through Oculus Cinema Src Backup Blu-ray/DVD movies to NAS to free space at home
Summary: Want a special Valentine’s day gift? Look at here! Pavtube offers a 50% off Blu-ray/DVD/Video Tools gift ideas for your one-of-a-kind love. There's no better way to show that special someone how much you care than with a personalized romantic gift! What is a personalized romantic gift? How about a video that records all the happiness moment you own together? Or a Blu-ray/DVD/Video tool to help your boyfriend to rip, copy, organize, manage and play his collected Blu-ray/DVD movies? Pavtube offers a collection of Blu-ray/DVD/Video tools gift ideas for your one-of-a-kind love, so you're sure to find the perfect item for your loved one.  Video Tool to Convert/Trim/Crop/Split/Merge Recording Videos: Perhaps, you have recorded some warm time with your iPhone 6S, Samsung Galaxy Note 5, Panasonic AG-HPX173MC/AG-HPX260MC and other smart phones, camcorders. Now it is the time to make your own romantic movie with these video fragment to show your love for your girlfriend at Valentine’s day. But before the production, you may need to convert the recordings to a format that your video editing software supported, like FCP X/6/7, iMovie, Premiere Pro CC since sometimes the format of the recordings of your smart phone or camcorder. Or you need to trim, crop, split and merge these recording videos. Pavtube gives you the solution with the help of Pavtube Video Converter Ultimate and Pavtube iMedia Converter for Mac. These two video programs are designed to handle various video files such as MP4, MKV, AVCHD 4K MTS/M2TS/M2T/TS, etc to output video formats not only supported by NLEs like FCP X, iMovie, but also by different devices, like iPad Pro, PS4. The most remarkable feature of these video converters is to output 6 types of Apple ProRes formats in Apple ProRes family, and they are Apple ProRes 4444 XQ, Apple ProRes 4444, Apple ProRes 422 HQ, Apple ProRes 422, Apple ProRes 422 LT, and Apple ProRes 422 Proxy, Apple Prores MOV, which is the best editing video format for FCP X, iMovie, Premiere Pro CC. What’s more, it also allows you to trim, crop, split and merge videos before you transcode your recordings to produce a romantic movie as Valentine’s day gift. Pavtube Video Converter Ultimate: Review Free Download 50% Discount Purchase Pavtube iMedia Converter for Mac: Free Download 50% Discount Purchase Blu-ray/DVD Ripper/Copier to Backup Blu-ray/DVD Disc If you're looking for a gift for your Valentine and your boyfriend happen to be a big movie fan that have collected lots of discs, what gift will be better than a Blu-ray/DVD Ripper/Copier to help him backup Blu-ray/DVD toNAS, Cloud Storage, External Hard Drive to protect his precious discs? Pavtube offers cute Valentine’s Day Coupons for Blu-ray/DVD Ripper/Copier to give you the chance to pick out the best Valentine’s day gift for your movie fan boyfriend. Now, have a look around and find the right programs for your Valentine. Pavtube ByteCopy: Review Free Download for Win/Mac 50% Discount Purchase for Win/Mac Key features: An Efficient, Safe, Fast, Easy-to-use Blu-ray DVD converter and convert movies to MKV/MP4/MOV with multiple audio tracks and subtitles Pavtube BDMagic: Review Free Download for Win/Mac 50% Discount Purchase for Win/Mac Key features: Copy BD/DVD with original structure, and convert 2D/3D Blu-rays and standard DVD for watching with fast speed and wonderful quality. Pavtube DVDAid: Review Free Download for Win/Mac 50% Discount Purchase for Win/Mac Key features: Powerful abilities to remove DVD protection, convert DVD to any video and audio format, and edit DVD to create personal movie. If you have any problem to buy or use Pavtube, pls feel free to contact support@pavtube.com , macsupport@pavtube.com
More Play 3D Movies on Gear VR through Oculus Cinema Get Amazon Prime Movies on Surface tablets for Playback Remove iTunes DRM and Convert iTunes video to Windows DVD Ripping Software-2D 3D Movie Tips HDTV can’t recognize the ISO files on the USB storage? Play 3D Movies on Gear VR through Oculus Cinema
With the popularity of Blu-ray, many people start to rent Blu-ray movies from Netflix, Redbox, Amazon at a relatively low price. But the copyright scheme and time box of these Blu-ray limits the playback and entertainment. So some people wonder whether they can backup these rented Blu-ray to NAS for permanent keeping and portable devices watching.  Actually, there is indeed a easy way to backup rented Blu-ray from Amazon, NetFlix, RedBox to NAS Device for permanent keeping and freely enjoyment on other portable devices. We all know that there are many Blu-ray Rippers for Windows and Mac on the market, whose function is exactly to help us deal with Blu-ray copy protected issue. From the google search on the internet, we choose high-rank Pavtube ByteCopy to reach the goal above-mentioned. ByteCopy gives you the best approach to bypass copy protection or remove region code restriction from rented Blu-ray from Netflix, Redbox, Amazon and backup them in four methods: full disc copy, main title copy, rip Blu-ray to lossless MKV with chapter markers and backup Blu-ray to other video formats. With ByteCopy, you can backup and convert rental Blu-ray to virtually any regular formats H.265, M3U8, MP4, MOV, MKV, FLV… to play anywhere with original quality. If you want to backup rental Blu-ray to NAS for streaming on mobile devices, game console, tablet and computer, I recommend you the third way. Note: this guide is based on Windows system, if you operate this Blu-ray backup process on Mac, you should use ByteCopy for Mac. Windows version Free Download and Install: Other Download: - Pavtube old official address: http://www.pavtube.cn/bytecopy/ - Cnet Download: http://download.cnet.com/Pavtube-ByteCopy/3000-7970_4-76158512.html How to backup rented Blu-ray from Amazon, NetFlix, RedBox to NAS? Step 1: Load Rental Blu-ray movies click “File” button to load Rented Blu-ray from RedBox, NetFlix, Amazon into the Blu ray ripping program.
  Step 2: Blu-ray copy If you just want to store rented Blu-ray from RedBox, NetFlix, Amazon to NAS, you can choose copy Blu-ray: A. Full Disc Copy: Copy Rental Blu-ray Disc to a full Blu-ray folder containing all the content in original Blu-ray disc. B. Directly Copy: Backup Rental Blu-ray Disc to a file with M2TS as filename extension. This mode enables copy movie only from Blu-ray discs, compared with former mode, save time in copying protected Blu-ray Disc and space to store the output M2TS file to make reasonable and practical use.
  Step 3: Choose other video format If you wanna backup Rental Blu-ray to NAS for other devices, you need specify a common format as output format. Click on the dropdown menu of “Format”, and then choose your needed one from the multiple output format presets. You can rip Blu-ray to lossless MKV, MP4, MOV, WMV, or rip Blu-ray for playback on iPad, iPhone, etc. Here, we select H.264 HD MP4 as the output video format for its wide compatibility.
  Tip: Click “Settings” button, you can adjust audio and video codec, size, bit rate, frame rate, sample rate and audio channel to customize the output file quality. Step 4: Rip Rented Blu-ray from RedBox, NetFlix, Amazon Once all steps above are finished, click “Convert” button to copy Rental Blu-ray movie to NAS device. When the process is completed, you can put the ripped Rental Blu-ray movie to NAS. Then, you can play, share Rental Blu-ray anywhere you want with various devices. More How to keep iTunes Rentals forever on your iPad series Backup DVD To Plex For Watching On Tablet/Laptop/Mobile Put C300 Mark II MXF on Zeiss VR One via Samsung S5 Convert ISO to MKV for Plex Server with full audio & subtitle tracks Solve Problems with VLC when playing 4K videos The way watching and enjoying 3D AVCHD on PC and Mac How to Stream 4K video from Windows 10 to HDTV? Src Search Results
DVD playback will never be limited in DVD Drive and professional DVD Player. There are many people watching their DVD movies on TV, PC, Tablet, iPad in Home Theater via NAS, Personal Cloud Storage,Chromecast. Rich media playback solutions riches the media life. However, only if you want to separate your DVD playback from DVD drive/player, you need to rip DVD to digital video format. And the work is based onDVD Ripper  However, there are plenty of great utilities designed to rip DVD discs and and give you popular video that are playable on any device you choose, whenever you choose to watch them. Too many choices makes no choice. Many people just get a headache when they need to select only one in hundreds. Here are three of the best 2016, based on thousands consumers’ nominations. 2016 Best DVD ripper #1: Handbrake OS Platform: Windows & Mac & Linux
 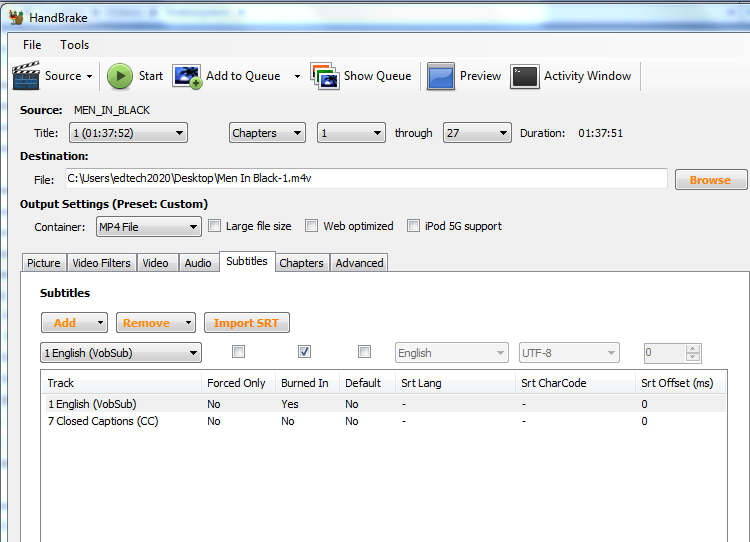 Key features: Handbrake is our favorite video encoder for a reason: it’s simple, easy to use, easy to install, and offers a wealth of tweaking options to get the best possible file as a result. If you’re daunted by them, you don’t even have to use them—the app will compensate for you and pick some settings it thinks you’ll like based on your destination device. So many of you like Handbrake that many of you use it in conjunction with another app (like VLC, which makes ripping easy)—you’ll let another app do the rip and crack the DRM on your discs, and then process the file through Handbrake for encoding. Pros: The app is fast, can make the most of multi-core processors to speed up the process, and is completely open source. Best of all, it’s completely free. Cons: Only outputs MP4, MKV formats. Only can rip unencrypted DVD. Handbrake isn't updated often. Its presets are often out of date. Editor’s note: Since it is free, I think I will choose it first if I need a DVD Ripper. After all, MP4 is enough for nearly all devices and media players. 2016 Best DVD ripper #2: Pavtube ByteCopy OS Platform: Windows & Mac Key features: Pavtube ByteCopy is your best DVD copying and backing up tool which can rip and backup DVD in any copy protection like Sony, Disney and region codes. It can convert DVD to any other formats like H.265, M3U8, MP4, MOV , M4V, AVI, WMV, MPG, MKV, etc or MP4/MOV with multi-track audios for playback on iOS/Android/Windows Tablets/Phones, HD Media Players (WDTV), editing software (Avid Media Composer, Adobe Premiere, etc.), and more. And other than that, Pavtube ByteCopy is also able to encode DVDs to MKV container format with preserving chapter markers, multiple audio tracks and subtitles and make it possible for you to easily select your needed tracks, subtitles when watching DVD movies with your media players. creating 3D video is supported by ByteCopy. What’s more, it also can rip and copy Blu-ray. Pros: A top Multi-track Blu-ray/DVD Converter to all of you with excellent ability to pick up multi-track for playing BD/DVD movies on Media Players and portable device. It also can extract subtitle/audio from Blu-ray/DVD. Cons: It is a paid one. If you want to use its free trial version, you have to bear the watermark in the middle of the video. Editor’s note: If I need a more powerful DVD Ripper, Pavtube ByteCopy is no doubt the best choice. But if I only need to rip DVD to MP4 and my DVD has no encryption, I will definitely select Handbrake. 2016 Best DVD ripper #3: MakeMKV OS Platform: Windows & Mac & Linux
  Key features: We’ve praised MakeMKV before for its ability to quickly and easily rip DVDs to high quality MKV files with a single click. The app has been in beta for a long time (years, in fact), which is just as well, since the developers promise to start charging for Blu-ray ripping once the app leaves beta. The app’s strong suits are that it’s fast, super easy, and cross-platform. Pros: The app preserves all of the source disc’s information, including tracks, chapters, HD audio, menus, and so on. The app is completely free. Cons: Only MKV output. Editor’s note: I found little software will keep multiple audio and subtitle tracks when ripping BD/DVD discs. But MakeMKV and Pavtube ByteCopy must be in the list. At the end of the day, DVD rippers are applications that set your movies from discs and allow you to have digital copies of the content that you’ve paid for. And please keep in mind, only personal usage of the DVD rips is legal. More Install Connect Your Galaxy Tab To A Mac Computer Using Mac Kies Rip 3D Blu-rays to Plex Server for playback with 5.1 channel on TV via Raspberry Pi Blu-ray to Galaxy - Rip Blu-ray to Play on Samsung Galaxy A8 for Freely M2TS to PS4 - Convert Blu-ray M2TS to PlayStation4 ATV 3 MKV best approach-Get MKV videos to play on Apple TV 3 without problems on Mac Digitize your Blu-ray/DVD movies for playing on Amazon Fire TV Copy Movie DVDs to 25 terabyte Drobo DAS Device for backup Src 2016 Best 3 DVD Ripping Software-2D 3D Movie Tips
The new Roku 4 promises the best-quality 4K video streams and makes 4K TV shows and movies easy to find with more 4K-capable apps than other devices . The voice search, a unique headphone jack and a finder function in remote makes it the best partner to the 4K TV. So if you have some 4K Blu-ray discs, how about ripping these 4K Blu-ray to Roku 4 so that you can stream 4K movies on 4K TV more conveniently? 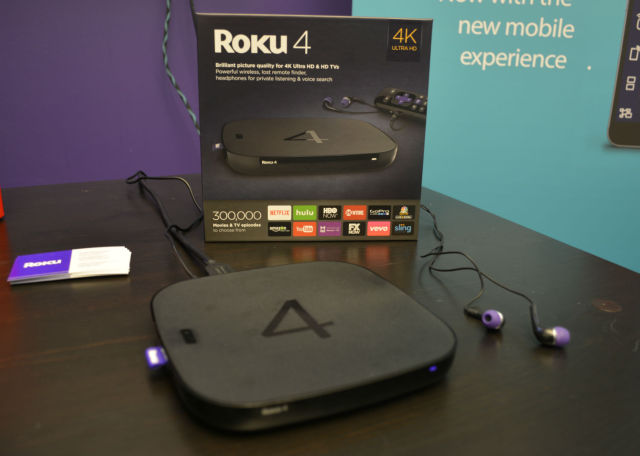 With a 4K Blu-ray Ripper, you can easily convert 4K Blu-ray to Roku 4 supported format. If you have no idea about this sort of software, I recommend you Pavtube BDMagic for Mac strongly. It can rip and convert any commercial and region-locked 4K Blu-ray to 4K MP4 on Mac (El Capitan included)which can be accepted by Roku 4 and any 4K TV. It can keep the original video quality while ripping 4K Blu-ray to Roku 4 on Mac. Besides, it allows you to compress 4K to 1080p for your normal HD TV so that you can play 4K Blu-ray on any Smart TV via Roku 4. Free download and install:
 Other Download: - Pavtube old official address: http://www.pavtube.cn/blu-ray-ripper-mac/ - Cnet Download: http://download.cnet.com/Pavtube-BDMagic/3000-7970_4-76177782.html How to rip 4K Blu-ray to Roku 4 for 4K TV? Step 1: Load Blu-ray movie. Download 4K Blu-ray to Roku 4 Ripper (Windows version) and connect an external Blu-ray disc drive to your Mac, instert Blu-ray disc, and click “Add Disc” button on this 4K Blu-ray to Roku 4 Ripper to import Blu-ray into this app.
 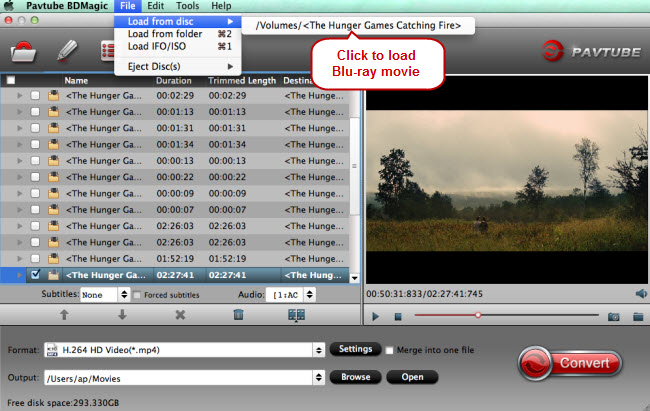 Step 2: Choose video format and set profile. Select the optimized video format for output. You are suggested to choose MP4 which is the most compatible format. Also, you can select the optimized TV format from “TVS” profile. If your 4K TV supports h.265 codec, you can choose H.265 MKV/MP4, from “HD Video” profile since normal 4K is encoded by H.265.
  Tip: If you also want to play this 4K Blu-ray on other HD TV via Roku 4, you can compress 4K Blu-ray to 1080p during the ripping process. Open “Settings” window, in size box of video, input 1920×1080. Step 3: Convert 4K Blu-ray on Mac Hit on the “Convert” icon and start ripping 4K Blu-ray to Roku 4 on Mac. When it is done, open output folder to locate the ripped 4KBlu-ray movies. You can follow the steps to play 4K Blu-ray on 4K TV via Roku 4 successfully. Just try it! And you can get the app at a big discount here. More Convert WMV to Samsung S6 for Playing with Zeiss VR One Tech Movie ShareWhy can't I play iTunes movies on TV via Roku 3? Rip/Copy DVD On Windows 10 With The Best DVD Ripper Put C300 Mark II MXF on Zeiss VR One via Samsung S5 Convert 3D M2TS to SBS/Red-cyan MP4 Convert ISO to MKV for Plex Server with full audio & subtitle tracks How to enable VLC media player to play Blu-ray films Watch YouTube 3D Videos on Sony BRAVIA HD TV Src Convert 4K Blu-ray for 4K TV Playback via Roku 4 on Mac
Downton Abbey has the latest Season 6. Actually, even though I love it, I gave it up when I watched Season 4. It is a pain for an impatient person to wait for a long time to watch the new episodes. But after Downton Abbey released Blu-ray version, I bought it and I want to review it from Season 1 on my HD TV. I plan to rip all the Downton Abbey Blu-ray to NAS so that I can watch them on HD TV via WD TV. The Blu-ray is new and I worry that they will be destroyed by my little kids accidentally.  I searched what format I should rip Blu-ray to. I know that WD TV can play virtually any file format including MKV, AVI, MP4, MPEG-4, MOV and more and my Samsung Smart TV H6400 should play MP4. So I decided to backup Downton Abbey Blu-ray to MP4 finally. Then I searched for “best Blu-ray Ripper” and find the Top Blu-ray Ripper review which introduced several top-ranked ripper in the market. I chose Pavtube ByteCopy because it claims that it supports to rip Blu-ray to MP4 with original video quality and offers 6X time ripping speed on Windows by H.264 codec. This is an big attraction for me, you know a housewife doesn’t have too much space time to do the job. Anyway, I used Pavtube ByteCopy to successfully rip my Downton Abbey Blu-ray to MP4. I transferred the backup to my Synology DS416 and tested the rips on my TV via WD TV. The image is almost as same as the playback effect when I insert Blu-ray disc. I decided at once to backup my collected Christmas DVD for my kids with it. (I forgot to say it supports DVD ripping, too.) I know there must be some people who like me that love to backup expensive Blu-ray to watch. For a office lady who doesn’t have the time to sit in the coach to enjoy the latest soap opera, getting the Blu-ray/DVD and spend a whole afternoon to watch it probably is enjoyment. So I shared my experience here and shared the Blu-ray ripping steps below. The steps are copied from the guide I read before. Steps to Rip Blu-ray to NAS for Streaming on HD TV via WD TV Step 1: Insert your Blu-ray disc into Blu-ray drive, Launch the program and click the “Disc” button to import the Blu-ray movies. Blu-ray folder and ISO files are also supported. You can select subtitles as you want.
 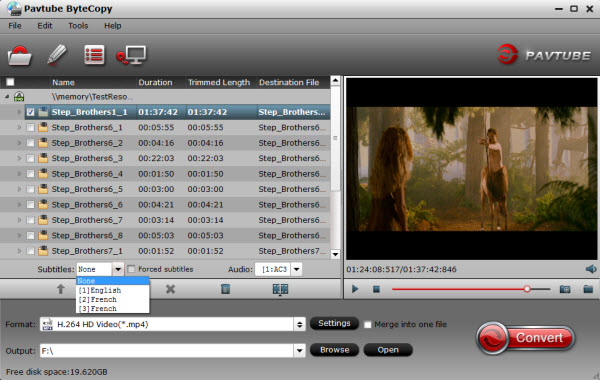 Step 2: Click Format and choose MP4 video from Common Video, which can be recognized by NAS/WDTV well. If your devices support MKV, lossless MKV is a good choice which can keep multiple subtitle/audio and all chapter markers. And then click the Browse button to specify an output folder to save the converted files.
 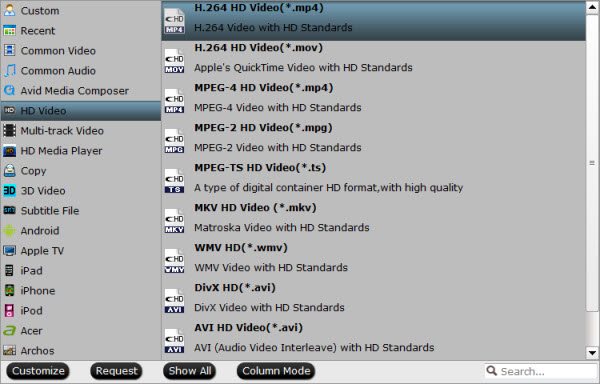 Tip: With the right settings you can retain the quality of the original Blu-ray while also saving space. This is particularly helpful when streaming over your network, depending on your network quality. Simply click Settings bar and you can tweak the settings to your satisfaction and even save it as preset. Step 3: Finally, hit the “Convert” button at the bottom of the main interface to start the conversion. It will automatically convert Blu-ray to HD TV/WDTV compatible video files. You can find the ripped Downton Abbey in output folder. If you don’t have a NAS, I think a Seagate Wireless Plus or a WD MyCloud even a USB Drive is also OK to store the ripped movies. Free download and install: Other Download: - Pavtube old official address: http://www.pavtube.cn/bytecopy/ - Cnet Download: http://download.cnet.com/Pavtube-ByteCopy/3000-7970_4-76158512.html More How to keep iTunes Rentals forever on your iPad series Backup DVD To Plex For Watching On Tablet/Laptop/Mobile Put C300 Mark II MXF on Zeiss VR One via Samsung S5 Convert ISO to MKV for Plex Server with full audio & subtitle tracks Solve Problems with VLC when playing 4K videos The way watching and enjoying 3D AVCHD on PC and Mac How to Stream 4K video from Windows 10 to HDTV? Src Backup Downton Abbey Blu-ray to NAS for Streaming